Friday, May 09, 2014

8th Bead Soup Reveal - UPDATED

Wow...another soup has been created and ready to show off.

Lori Anderson has done it again with an amazing blog hop with some very talented jewelry designers.

I am so very thankful for my partner Christine for all the amazing beads she sent me.  Christine has 4 young men and really enjoys spending time with them.  She told me she now sells her jewelry in 5 local shops where she lives.  I am sure that keeps her quite busy... She loves vintage and creates many of her pieces with that old antique look and feel. I love the stuff, but really have not ventured into this area with jewelry making.  So this was a bit of a challenge for me at first.  I did some drawings, some I liked and some I didn't..  If you want to take a peek at the soup she gave me before I created the designs out of them, you can find them here.

So, here is my first creation...  I think I am going to redo this piece.  I am not totally happy with it.  I love LOVE the pendent and the leaf below it..which was made by Jeannie K Dukic of JKD Studio. I drilled two more holes in it so I could put the leaf below it.  I know I can do better with this pendent, but for some reason, I didn't have the vision.  You know how it goes when you don't have the visual idea in your head...  It will get there eventually...the AH HA moment...
As you see, the pendent is beautiful and the leaf is perfect for the pendent.
I really do like how this part of the necklace turned out.
I decided to use the wooden beads, but it makes the necklace really light in weight. I used wire, perhaps that is why I am not totally in love with the necklace.  I thought the wire would be a good mix, but I think that may be the problem...  I do like the sari silk and that I added the seed beads to it to spice it up some...

UPDATED NECKLACE
Ok, So I did something a little different...I thought I would try using these fun backgrounds I got from GraphicsStock.  Let me know what you think of the updated necklace. I took off the wire and used some nice heavy CLon thread and strung on the beads.  I made some bead caps with the really pretty drop beads.  I wanted to use them and just couldn't figure out what I was going to make with them.  So finally the light came on with this necklace.  I think its much better, fits nicer and has a little more pizzazz. I made a beaded bead using the same drop beads and put it in between the beads on the left side.  I also added more of the sari silk knots and beaded those up too.  I am now happy with the results.
This may not look a whole lot different, but believe me, its much nicer...

Close up of beaded  bead...this was not an easy to make bead...it looks nice, but what a challenge...I used right angle weave to make a cube, then beaded the drop beads in between each side. 
These fun bead caps were very easy to make...I just made a simple ring with seed beads then went back around and added to drop beads. I considered making them for both ends of the beads but then they didn't hang right on the coin beads.


For the second piece, it took me some time to figure this one out, but when the idea hit...it hit in full speed!
I just took this picture today. Natural lighting is always better to show off the true colors...I think it shows off the necklace a lot better.  You can really see the two different chains I used and all the beautiful beads... Christine has a good eye for bead soups...  :-)
Love this necklace.... I used two types of leaf chains, one which Christine gave me and one I have had for a long time and I guess I was waiting for the right time to use it.
I wire wrapped the beads onto the chain.  Used the large green magnetite bead for the end bead.  This gives it the nice balance in weight.
I found this ribbon at Sams Club which was on clearance from Easter...I love clearance stuff...who doesn't?  SO, I cut it up and made a kumihimo braid out of it for the back half of the necklace... Glued the ends and added the caps and wire...  The kumihimo braid is a bit thick but I think it fits this piece rather well.  If it was thinner, I think it would not have felt right when its worn..

Look at this awesome clasp!  I love it...  At first I wasn't sure what I was going to do with it, I don't usually use large clasps... then as I was browsing through some magazines...that...OH YEA...now I know what I am going to do...I wanted to make a lariat.  I have never made one before and it was time I did!  I laid out the beads and chain and got to work.  First though I had to attach the clasp.  It weighs down the necklace enough that it fits nicely.  The large bead fit perfectly through the hole of the clasp so I knew this was going to work for what I had in my head...  :-)

See how pretty this looks...
The colors were a perfect match for me.  You know how you can have that mental block on certain colors...well, I get that with certain colors of beads...guess I need to get past that some day...LOL
I know I know...the colors of the bead look slightly different..Well, I had to use my older camera to take the pic...so it didn't quite make the lime green pop...they are beautiful beads...
YUM!

Ok, I think you are really going to love this next piece... I am not sure if its my favorite or if the necklace is my favorite...but its quite yummy..
Now this is probably the toughest design I came up with.  Not that it was hard to make, it was more like...what the heck do I do with those amazing antique buttons!!!  I wanted so bad to put them in the right place in the design and to have them pop out somehow.  This was my biggest challenge I think.  It was the last piece I made.  First I made the bracelet...I love it...I love how it fits but...it was a tad loose.  So, I had to do some brain storming and finally I decided to use the sari silk.  Well... I didn't want it to be attached to the bracelet so I then remembered in the back of my head how one of the FB members made these great leather clasps with snaps. (Jean Campbell???)..well, mine are not as pretty, but I think the set turned out ok after 2 attempts...I used heavy gauge wire for the connection parts...the j hook and the end it hooks on.  I need to take a better picture so you can see what I mean...  :-)

See the beautiful pendent...its a vintage button glued onto a filigree backing...LOVE..
I used a flower chain I had received from ZnetShows which I took apart and re-attached. I wire wrapped the vintage diamond buttons into the center of the larger metal flower, then attached the smaller flower to the bottom of the larger flower.
I attached the small leaf beads to a ring and then put it in-between the beads.
Here is another view of the other side.
See how pretty this turned out...  
Here is the close up of the clasp I made.  I worked out fairly well through trial and error.  I used a regular ole tiny hole punch to put holes in the leather.  I didn't even need to glue anything down.  I am not a heavy fan of using glue in jewelry, but I do if it is necessary.

UPDATED

I wanted to share another bracelet I made with my soup mix...  I really like how this one turned out even though it is quite simple.  Sometimes simple is the best way to go... 
This is the same necklace I put on a background graphic I got from GraphicsStock.  I used the beautiful green beads from my soup and some really pretty agate rocks from our local rock store...I really like the greens, blues and purples mixed in.  I made the claps from heavy gauge copper.  

Thanks once again Lori Anderson for this awesome Bead Soup Blog Party...  Please check out her blog to see the list of all the FANTASTIC jewelry designers... You dont want to miss out!


Saturday, May 03, 2014

ZnetShows Summer Bling

As a design partner, I am often asked to create designs for ZnetShows.  They will send me a little bundle of beads to play with.  Summer is almost hear and so this new challenge is for creating summer jewelry.  We got to pick out 2 colors, I chose pink and yellow.  So on Thursday I received my bundle and this is what I received.


I am quite excited about this challenge because we were asked to make a piece that is for everyday wear and a formal evening piece.  I have a couple of ideas, but I need to get to the drawing board and start drawing up my ideas.  Im thinking that sterling silver will be for the evening wear and copper for the everyday wear...  check back soon and see the progress of my creations.  You can also just follow me and get the updates..

Thanks for stopping by...  ENjoy your weekend.

Sunday, April 27, 2014

BSBP Soup Teaser

Well, I finally had some time to play with my fun bead soup from my bead partner Christine.  I though I would share a little teaser...  Now, this is just one piece and I still have a whole lot more to make..Christine gave me a ton of beautiful beads..  Im still undecided on one of the pendents as to if I like what I made or if I need to take it all apart and do it over again...  I like the pendent a whole lot, but I am having a difficult time making it shine....  I still have a week to go...wish me luck!!  :-)

Sunday, April 20, 2014

HOPPY EASTER!

Today's world is a little mixed up and people go nuts when you post something they dont like or take offensively.  Personally, I take no offense of other peoples opinions.  Its just their opinion so why should it matter to me?

So with that said...  I hope everybody in this entire world has a wonderful day, enjoy the spring flowers, and for those who celebrate on this beautiful day...

Happy Easter!


Saturday, March 29, 2014

My Painted Pendents...

I decided to write a blurp about my newest creations.  I started painting these fun little pendents about a month ago.  I keep getting more and more ideas from people I talk to.  I have also stopped by our local bead stores and shared some of the finished pieces.  Last week, I walked into the bead store to bring a pendent to one of the ladies that works there...she loves my stuff.  It was almost time for her to get off work so I hung out for a few while she was finishing up with a couple of customers and she told me to spread out the pendents on the counter.  There was probably 5 or 6 ladies there and they were all checking out the pendents...it was quite fun to hear all of the positive feedback.

This little fairy is a special order which I will be taking to her new owner next week...photos are better when they are taken before I coat them with resin

I want to share how I actually come up with the pendents...and how much work goes into them. I purchased a class online about creating zentangles on pendents.  After watching the videos, I started to play around a bit with the clay.  I have been wanting to paint up some of my photos I have taken over the years and thought...hmm...why dont I just paint on the clay pendents instead of doing the Zentangles...  So I painted up a couple of them...liked how they turned out...asked one of my FB groups what they thought...  One idea was to make them thicker..  the first batch was a bit thin I will admit.  Then another opinion was to seal them with resin...WOW..now that changed the whole way they looked.  The first batch I ruined...yea, sad..all that painting and poof...broken nasty pieces of clay.  The second batch I did was far better.  Then, I decided to make the circles into domes...  and that is where I am today...
I was asked to make a hammer head shark...what do you think on this one..very cool?  I had a fun time making this one...it has glitter one its belly..

So, the very first thing I do, is pick a photo I have either taken myself, of found on google..or better yet..Pinterest...  I basically will change up the image to what I like..  I dont have any examples of my drawn pendents... only the finished pieces... Let me start again.  I first sand them after baking.  I tried 3 different brands of clay and have found only one that doesn not resist the watercolors.  Trial an error is the only way to perfect things..and really my pieces are far from perfect..but its going good so far.  So...after they are sanded, I draw on them.  I do some shading with pencil to get a good idea of how they are going to look once I start adding the watercolors.  Next, I decide what I want to paint first.  Sometimes the background gets painted first and then the main object, or visa versa.  Either way, its a bit of a process.  Most of my pendents take me less than an hour.  But if you look at the mermaids..those take me more time.

These are also a special request, they are sisters to the first pendent I made like this..  You see how they are not exactly the same, but they look similar enough...so cute!


I usually paint one pendent at a time.  Recently though, I needed to paint 2 mermaid pendents the same design.  I prefer not do duplicate my creations but I will if requested.  I think mainly because I forget what I did with the first painting...LOL  I have posted a couple of pendents on Etsy, but have not had one purchased yet.  I have recieved an order though which is just as good.  I have since made about 10 special orders with the pendents which I truely appreciate.


This one is a rectangular pendent I made of a horse...I am not 100% sure I like the wire dangles with the beads on the ends...I like the idea of them, but I still am not quite sure.  I think there needs to be something to wrap around the pendent or infront like this...hmm...any suggestions?


Thanks so much for stopping by my blog.  Perhaps in the near future I will do a give away...Hmmm...what do you think?

Saturday, March 22, 2014

My BSBS Partner - Christine Stonefield

Well, its about time I sit at my computer and start writing about the BSBP bog hop which will be happening before you know it.  But before I do anything else, I want to introduce you to my fantastic BSBP partner, Christina Stonefield.  She is an amazing mother of 4 young boys which I am sure keep her quite busy.  She is also creates beautiful vintage jewelry designs.  I love vintage jewelry but have not dabbled in that area much when it comes to designing jewelry. You can find her work here, and you can also find her as one of ZnetShows very talented jewlery designers. We discovered we have a bit in common such as being a designer for ZnetShows, love the beach and the mountains.  We both have boys although she has 2 more than I do.

With this in mind, I really enjoyed making her a couple of pendents with those fun vintage colors of oranges, golds, blues and a hint of green.  I sent her one package to start off just so she could have a head start...and now I am finishing up on a second pendent I really want her to have.

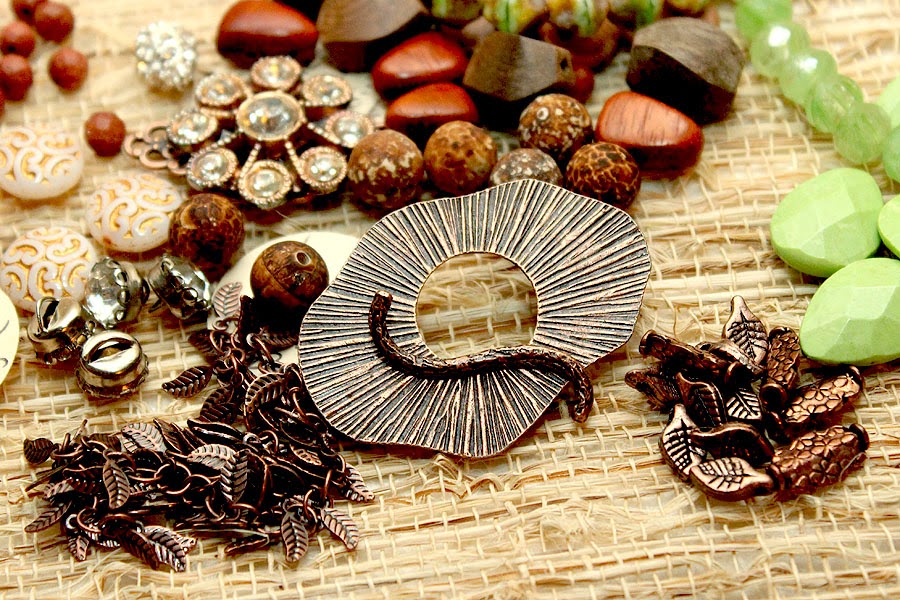
Below are the beads which I recieved from her...I just love ALL of them...
THANK YOU CHRISTINE!!

WOW...what do you think so far?

This is a beautifully created pendent and leaf are made by Jeannie K Dukic of JKD Studio

Yummy coin beads...

Look at those beautiful vintage buttons...I need to think about how I can create with those babies...

I love this huge clasp...I have always been attracted to the clasps almost as much as the pendents...LOVE!

See the beautiful handful of wooden beads...Hmmm...what to make with those!

One of my favorite colors...bright apple green...yuuuuummmy!

THANKS AGAIN to Lori Anderson who put this fantastic BSBP together...

Be on the look out for May 1st for the reveal!

Oh..and finally one last note...I think I forgot to photograph the soup mix I sent Christine.  I can not find the pictures on any of my sdcards...UGH..my big camera was in the shop at the time so maybe I just forgot.....but thats ok, I know she will take pictures...

Chris  :-)


Friday, February 28, 2014

"Clean-up, Fix-up" your workspace BLOG HOP is March 1st!

UPDATE:

Well, I actually got a few nice shots of my room.  I actually have gotten a whole lot done but I am only going to post this one shot for now.  I have big plans for my work room.  IKEA has become my new best friend, and eventually I will have a lot of their shelving units and cabinets.. I am just waiting for that day...first we desperately need to remodel our bathroom.  Baby steps...LOL

total mess and cluttered to the point where I can barley do much of anything...

ahhh, elbow room although the space is a bit small but definitely improved!

WOW...what fun this blog hop is going to be when I sit down and check out all of the fun re-organized work spaces.  I unfortunately have a little issue which I hope you will forgive me.  My best of the best cameras had broken earlier this week and I ended up sending it to the shop (about 3000 miles from my house) good thing its under warranty UGH. 

Although it is not here for me to take amazing pictures, I do have my baby camera. I have not had a chance to take all the pictures at the moment, but I do hope to have mine up by Sunday...so please check back...SORRY...

In the mean time, check out all of the other blogs listed below...and enjoy the results...


Participant List:


Host: Sharyl McMillian-Nelson … http://sharylsjewelry.blogspot.com

Donna Millard http://fyrebeadz.blogspot.com/


Beda Hendrix ... https://www.facebook.com/SasijuhlsThings 

Ann Schroeder… http://www.beadlove.wordpress.com


Pamela Rachelle… http://crazycreativecorner.blogspot.com

Kristin L Oppold… http://www.yayjewelry.blogspot.com

Heidi Kingman ... http://heidikingman.blogspot.com

Andi ... http://strungoutjewelry.blogspot.com/

Patricia Buchanan Click “Blog” on the menu bar athttp://www.braceletstoo.artfire.com

Helen Simon… http://helensharvest.com/

Kashmira … http://sadafulee.blogspot.com/

somethingunique ... http://somethinguniquebylana.blogspot.ca/

Renetha ... http://lamplightcrafts.blogspot.com

Kathy Lindemer ... http://bay-moon-design.blogspot.com

Swapna Dinesh … http://www.swardaa.com

Linda Landig ... http://lindalandig.wordpress.com/

Ann Schroeder ... http://www.beadlove.wordpress.com/


Beti Horvath ... http://stringingfool.blogspot.com/

Sam S ... http://samsbeadshopandjewelry.blogspot.com/ 

Christina Miles ... http://wingsnscales.blogspot.com/

Islandgirl ... http://islandgirlsinsights.blogspot.ca/ 

macmillanmarie ... http://www.macmillanmarie.blogspot.com

Emma Todd … http://www.apolymerpenchant.com

Neena Shilvock … 

http://www.capriliciousjewellery.com/3/post/2014/02/neither-ship-shape-nor-bristol-fashion.html

Dee Clark… http://biz-e-bead.blogspot.com/

motidana ... http://kalaabhushan.blogspot.com/

Here Bead Dragons ... http://beaddragons.blogspot.com/

Carol D. ... http://dillmansdallies.blogspot.com/

Pam Sears ... http://crazycreativecorner.blogspot.com/

Nan Smith ... http://wirednan.blogspot.ca

AliMc ... http://northwoodscreativestudio.blogspot.com

Kari Asbury ... http://hippiechickdesign.blogspot.com

Shirley Moore ... http://www.beadsandbread.blogspot.com


PyxeeStyx ... http://travelingsideshow.blogspot.com/

Jayne Capps … https://mamasgottodoodle.blogspot.com

Louann Elwell 

... https://plus.google.com/117746558861718110652/posts

Rain ... http://honeyandollie.com/

Lori Bergmann ... http://www.LoriBergmann.blogspot.com

Helen Simon… http://helensharvest.blogspot.com/

Arlene Dean ... http://aglassbash.blogspot.com

Sandra... http://city-of-brass-stories.blogspot.de/

Alicia ... http://www.allprettythings.ca


Natalie Pappas ...  http://blog.nkpdesigns.com/

Mike Flint ...  https://www.facebook.com/bagomag

Sunday, February 23, 2014

Cabochons

Well, I think I got the right mix of things now with my newest creations, Cabs!  Cabochons have been very interesting to me these days and I have seen sooo many beautiful ways to make them.  I decided I would put my own touch into making these little creations.  I have had several rejects which I will share with you here...  But now that I think I have it going good, I went ahead and listed them on my etsy which I will give you the links below

This is my first piece. It looks great, but is too thin...but its still a nice piece.

This is really pretty but when I put the resin on top, I did it wrong and the resin ended up being really thick and has a lip on it that I need to remove.


Basically I still have these 3 pieces.  The orange starfish I made into a pendent and its going to be on a beautiful necklace which you will get to see soon..  I promise, it will be well worth the wait!

In the first batch, I lost 2 pieces due to the resin leaking past the tape.  I learned later from an awesome group of ladies on a facebook group I belong to, how to do the resin the correct way.  Phew!  So glad to have beading buddies!

What I do, is hand draw on the piece with pencil, shade it in with pencil, add the water colors, then spruce it up some with white acrylic paint and a hint of ink pens.  Heat set them and put a layer of resin on top to add that extra shine and it also helps with the durability of the cab.  I tried 3 different brands of clay.  One, which I have to order is the Kato clay...love it!  Second is the Craft Clay which is the Michaels brand...HATE IT! and Sculpy 3 which works really well but is not quite strong, but I do like how easy it is to work with.  I have used Sculpy clay for a long time with just other stuff, but not as a cabochon.  I think since I dont have to order the clay and its easily found at Michaels, I will just continue to use this.  I will do a clay comparison later..

So, now for the final fun creations... Now available on my Etsy shop...


Sunday, February 09, 2014

New Listings...

Happy Hearts...

Yes, time is running out for Valentines day...I think I am going to go to Rocky Mountain Chocolate and find something a little fun for hubby.  He is a chocolate-aholic.  Hehehe..

I recently posted a few of my heart designs in my Hand Made Artist shop if you want to take a peek!  They are sooo pretty.  I really think the bracelet is fun. It makes a little music when you wear it...the beads have a tune of their own!


Tuesday, January 28, 2014

Hmm, which would you rather have???

Since I have been trying to work more with polymer clay, my hands have been getting so tired of cranking the handle of my pasta machine...the worst part is that I somehow managed to lose the clamp, so it makes it even more challenging to crank that ole handle. Its not bad if you just have a few crankings to do, but when you have to condition Kato clay, it takes forever to condition. Trust me, I have experienced the challenge of conditioning Kato clay..love the stuff..but wowsa!

So, I did the hunt...and found a set of pasta attachments for my kitchenaid...(gotta love Amazon!) OH ME OH MY...I LOVE IT!! If you are a polymer clay artist, I would definitely invest in this handy tool. I hooked it onto my kitchenaid and turned that puppy on..and within minutes my clay is ready to play with. Even the Kato clay is easier to run right through the machine...Ahhh, what a relieve it is!

My hands are so much happier. It has all of the same settings as the old hand crank pasta machine...and its easier to use. You just pull out the knob a little and it pops into its place. I can say that this is my new best tool... Its not cheap mind you...but you have to consider what your hands go through. Trust me, your hands will be so happy when you decide to give up the old hand cranking pasta machine...